Skip to Content
 

Making Set-Up Boxes

28 replies [Last post]
Anonymous

Set-up boxes (also called full-telescoping boxes) can be fairly easily made with a few simple tools. The process itself is actually fairly simple. Once the measurements have been determined, a piece of chipboard (also called boxboard for obvious reasons) is cut to size and then scored where the sides will fold down. The excess corner pieces are removed and the sides are folded and taped into place. Sounds easy, right? Here are the full directions along with materials recommendations and sizes of some of the more common boxes in the industry.

Note: Click on the images to get a full size version.

MATERIALS
Board: Either single-ply chipboard or single-ply illustration board (see below for information on choosing a type of board).

Tape: I used masking tape since it’s repositionable and fairly thin (won't show as much under the artwork wrap).

TOOLS
Clamps: Quick clamps are about the best things ever invented! Two of them used together can apply more than 250 pounds of pressure for pressing and clamping, I use the Quick-Grip mini bar clamps.

Cutting Mat: Great for using as a backing to cut when using an xacto knife. Be sure to get one that is larger than the largest piece you wish to cut.

Xacto Knife and Blades: To cut and trim the materials.

Straight Edge: Either a metal ruler or a ruler with a metal edge. The metal will keep the xacto knife from cutting pieces from the edge of the ruler (and no longer cutting a straight line).

Cutting Fence: I use a piece of 1"x2"x24" hardwood (maple) that I clamp to the working surface. For larger cuts, or for cuts using an elevated fence, I use a 3"x3"x24" piece of oak (specifically made for wood turning, which means that it will be straighter and more accurate). You can also use pine, but I find that the hardwood pieces tend to be straighter and stay straighter over time. When using a cutting fence that you clamp to the working surface, you must have a working surface that has enough clearance beneath it to accommodate the clamps used to secure the fence.

Gapping Materials: Since you will need to set a cutting fence at a variety of distances from a fixed backing, you will need materials in a variety of thicknesses to set an accurate gap. Wood can be used for gaps of 1/4" to 1" or more. Aluminum bars can be used for gaps of 1/16" to 1/4". Scraps of single ply chipboard can be used for thicknesses of approximately 1/32".

Scoring Tool: Basically a hand held device with the tip of an xacto blade sticking out from the bottom. I made one from some scrap 1"x3" pine stock, a few screws, and an xacto blade. I used the blades from the xacto wood carving kit since they are thicker and will stay straight when cutting. The regular xacto blades will probably work just as well, though I haven't tried them.

To make a scoring tool, cut 2 pieces of 1"x3" stock that are approx. 3" long. Secure them so that the long edges line up perfectly (set them on a flat surface and use a quick-clamp to secure them together. Pre drill and countersink holes for screws at either edge. Screw the two blocks together. Doing so with no blade between them will ensure that the blocks will be snug when assembled with the blade in place. Disassemble the blocks and cut very shallow grooves in the blocks where the blade will go. This will keep the blocks from deforming when reassembled with the blade in place. Just be sure that the grooves aren't so deep that the blade moves freely when assembled. You shouldn't need anything else to hold the blade in place except the pressure of the blocks when screwed together.

Note: You can use a straight edge and an exacto knife to score the boards. Just be sure to run the knife lightly over the boards one or two times to score approximately halfway through the board. Doing it this way will be very time consuming. If you're planning on working on more than one or two boxes, you should take the time to make a scoring tool. It takes about 30-45 seconds to score a board using the scoring tool (once the backing and gapping materials are set in place)--much faster than measuring and scoring with an xacto knife.

GETTING STARTED
First decide the size of the box. You can start by measuring the size of an existing box or you can create a custom box of any size that you want.

To measure an existing box, be sure you measure the piece of chipboard that forms the top of the outer piece or the bottom of the inner piece. If you look carefully at the box itself, you will see the edge of the chipboard piece beneath the artwork wrap. This will be roughly 1/16" from the outer edge of the box half. This is the measurement for your piece (not the outside measurement).

It will take some getting used to measuring the chipboard beneath the artwork wrap, but you'll get the hang of it. Simply remember that all box dimensions (both top and bottom) are in even 1/16ths of an inch (or even millimeters if made using metric measurements). If your measurement isn't an even 16th of an inch, then round up or down.

Depth is measured in the same way, by measuring the board beneath the artwork wrap on any side of the box (tops and bottoms have the same depth).

To create a custom box, start from either an outer measurement (roughly the finished size you want for the box when assembled) or the inner size (the size of the well of the inner part).

The size of the box will determine the type of material to be used. Smaller boxes (roughly 8" square or smaller) can be made of single ply chipboard, which is thinner. Larger boxes can be made out of more sturdy illustration board (only slightly thicker than single ply chipboard, but very durable and straight for use in bigger boxes).

Once the material has been chosen, you can choose the difference in measurement between the outer and inner halves of the box. For chipboard, you may use a difference of 1/8"-3/16" or multiple differences (one difference for the width and another for the height). Some companies use a difference of 1/8" in one direction and 3/16" in the other. This is to allow for the extra artwork wrap one opposite sides of the box. That is, if the extra flap of artwork from the sides wraps to the top and bottom edges, then the height would have a difference of 3/16” and the width would have a difference of 1/8”.

For illustration board, use differences of 3/16"-1/4".

Since the artwork for your box will likely be laminated, you may want to go to the thicker difference between top and bottom pieces.

For Example: The tops of the Fantasy Flight Silver Line boxes have a measurement of 7.75" x 10.125", the bottoms measure 7.625" (difference of 1/8") x 9.9375" (difference of 3/16").

LAYING OUT AND CUTTING THE BOARD
Once you have determined the sizes for the top and bottom pieces and the height of your box, you can calculate the size of board to cut out. For each board you will need to know the width, the height and the depth of the box. Calculate as follows:

Board size = WIDTH + 2 * DEPTH x HEIGHT + 2 * DEPTH

For example: the Silver Line boxes are 1.5" deep. The tops are 7.75" x 10.125", the bottoms are 7.625" x 9.9375". The board for the top piece should be:

7.75" + 2 * 1.5" x 10.125" + 2 * 1.5" = 10.75" x 13.125"

The board for the bottom should be:

7.625" + 2 * 1.5" x 9.9375" + 2 * 1.5" = 10.625" x 12.9375"

Note that the difference in width from the top to the bottom is only 1/8" and the difference in height is 3/16". If you wanted to make a box the same size as the Fantasy Flight Silver Line box, but made out of illustration board (for extra stiffness and durability), you would start with the same size top piece:

7.75" + 2 * 1.5" x 10.125" + 2 * 1.5" = 10.75" x 13.125"

and adjust the bottom piece to have a difference of 1/4" on either dimension:

7.5" (7.75" - .25") + 2 * 1.5" x 9.875" (10.125" - .25") + 2 * 1.5" = 10.5" x 12.875"

You can cut the board in a variety of ways. The simplest is to measure the sizes on the board and cut them using a metal straight edge and an xacto knife. This will be a little more time consuming and probably not recommended for making more than a few boxes of the same size.

Note: When using an xacto knife and a straight edge to cut the board, make multiple, shallow cuts to gradually cut through the board. Trying to cut through the board in a single pass will put too much pressure on the blade and could cause it to snap or wander off the cut line resulting in an uneven edge.

Cutting out larger numbers of boards of the same size is best accomplished using a cutting fence and a cutting device. The best for cutting chipboard is a guillotine style paper cutter. Your rotary trimmer may also be capable of cutting chipboard in straight and accurate lines (mine makes a mess of it).

Set the fence (I use a 24" piece of 1"x2" stock) at the proper distance from the cutting edge and clamp into place. Then simply set the piece of board against the fence and cut. Begin with either the top or bottom dimensions and cut first the WIDTH + 2 * DEPTH and then the HEIGHT + 2 * DEPTH (or vice-versa). Repeat for the other piece (if you cut the top pieces, then repeat for the bottom pieces or vice-versa). Note that when using a guillotine style paper cutter, press firmly on the chipboard stock when cutting since the blade tends to pull the material away from the cutting fence as you cut.

SCORING THE BOARDS
Once your boards are cut, you can begin scoring them. The scoring will cause the board to fold in a predetermined way without undue bunching or deforming of material. A proper score should be close to 1/2 the thickness of the board being used. To achieve this, use a fixed a backing against which the board will be placed. A raised cutting fence is then clamped to the backing such that a board may easily slide underneath it and come to rest firmly and squarely against the backing.

The distance from the backing TO THE CENTER OF THE BLADE WITHIN THE SCORING TOOL WHEN SET AGAINST THE CUTTING FENCE must be exactly equal to the required depth of the finished box. In the example of the Fantasy Flight Silver Line box, the distance of from the backing to the center of the blade within the scoring block must be exactly 1.5".

For my scoring tool, the center of the blade is roughly .75" (but not exactly) from the edge of the tool. I therefore need to use another .75" (approximately) of gapping materials. In the illustration below, the only gapping material required is a single piece of wood measuring .75” thick. Hold the gapping materials next to the scoring tool and measure from the edge of the gapping materials to the center of the scoring tool blade.

In the following illustration, I show the gapping materials needed for a gap of 1.375”. As you can see, a variety of materials are needed to get exactly the right gap. I had to use a clamp to hold all the gapping materials to the scoring tool so I could measure them.

Begin by clamping the backing to the working surface. The backing must be longer than the longest edge of your cut board (with enough room on either side for clamps). Then set your cutting mat on the working surface against the backing. Set 2 pieces of board on the cutting mat against the board, then set your gapping materials on these boards and against the backing, clamp them into place. NOTE that you don't want to clamp them so tightly that the edge of the gapping material is deformed, since this edge will determine the straightness of the scoring.

Remove the 2 boards and you're ready to begin. Using 2 boards for the gapping material will create an elevated fence under which a single board will easily slide for insertion and removal.

Note that this setup will be used for all boards of your box (both tops and bottoms). Take a SCRAP piece and do a test scoring to check for proper placement of score (proper distance from edge of board to the score) and proper depth. Place the scrap against the backing. Set the scoring tool against the gapping materials so that the blade begins off of the board. Applying neither too much nor too little force, drag the scoring tool along the gapping material once or twice until a proper score is formed.

A properly scored piece will bend easily along the score. You don't want to score so deeply that the board is cut completely through (either entirely across or in places).

Once you're ready to begin, take a piece of cut board and rest one edge along the backing. Score, remove and repeat for the other edges of the board. Repeat for all boards.

Note that you will only score ONE SIDE of each board.

FINISHING
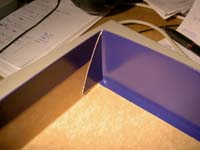
Once scored, you will need to cut out the corner pieces. Carefully run an xacto knife along the scored lines to completely cut away the pieces of the corners of every board. After doing so, you'll have a bunch of fairly uniform tiles to use in other prototypes!

Once the corners have been cut, fold each side of each board.

Precut enough pieces of tape for each corner of each board.

For each corner, fold the sides down so that they line up at the edges. You may need to push one edge up slightly to get them to line up. Once aligned, apply the tape to hold the corner together. Repeat for all corners of all boards.

That's it, you've got your finished box!

SIZES OF COMMON BOXES (measurements in inches)

Mayfair Midline (Modern Art, Power Lunch, HellRails, etc.)
Top: 6.25 x 8.375 x 1.75
Bottom: 6.125 x 8.1875 x 1.75

Fantasy Flight Silver Line (Citadels, Arena Maximus, etc.)
Top: 7.75 x 10.125 x 1.5
Bottom: 7.5 x 9.9375 x 1.5

Rio Grande/Alea (Puerto Rico, etc.)
Top: 8.5 x 12.0625 x 2.5
Bottom: 8.3125 x 11.875 x 2.5

Large Square (Fantasy Flight (Lord of the Rings), Days of Wonder (Ticket to Ride), etc.)
Top: 11.5625 x 11.5625 x 2.6875
Bottom: 11.375 x 11.375 x 2.6875

Zzzzz
Zzzzz's picture
Offline
Joined: 06/20/2008
Making Set-Up Boxes

Great job on this how-to Steve, thx!!

(another beautiful wiki fodder item!!)

nosissies
Offline
Joined: 07/26/2008
Making Set-Up Boxes

very nice Steve, so when do we get instructions for doing a fully wrapped set-up box? :-)

peace,
Tom

Anonymous
Making Set-Up Boxes

I'm actually working on some artwork for a game box. When I get the artwork printed, I'll take pictures of the wrapping process. It's pretty straightforward (based on the tests that I have done). The hardest part is the set-up of the artwork for the wrap. Once that's done, the actual wrapping shouldn't be too bad (as long as you're not afraid of spray adhesive)!

phpbbadmin
Offline
Joined: 04/23/2013
Making Set-Up Boxes

Sisk,

Just curious, could the same process be duplicated by using a rotary trimmer and using the optional scoring blade? I know my fiskars has that blade available, might be worth a look.

-Darke

Anonymous
...

Just wanted to say how outstanding this tutorial was!

Thanks a bunch! 8)

seo
seo's picture
Offline
Joined: 07/21/2008
Making Set-Up Boxes

Darke wrote:
Just curious, could the same process be duplicated by using a rotary trimmer and using the optional scoring blade? I know my fiskars has that blade available, might be worth a look.

A perforating blade might also work ok (as long as you plan to later cover the folded edges with the art). The key is to weaken the paper/cardboard fibres before you fold it, so that the folding line is straight. When folding a light cardboard, even a worn-out pen can be used, instead of a cutter (that's actually preferable, since the material is thinner, hence the cutter method is too risky).

Seo

FastLearner
Offline
Joined: 12/31/1969
Making Set-Up Boxes

I've had good success with the Fiskars scoring blade on thin and medium-thick cardboard. Even if you pushed really hard, it might not be enough for heavy cardboard, though.

-- Matthew

Anonymous
Making Set-Up Boxes

Darkehorse wrote:
Just curious, could the same process be duplicated by using a rotary trimmer and using the optional scoring blade?

I didn't even know that rotary trimmers came with such a thing. Very cool!

The real trick is to set up a backing fence against which the board is held at a set distance from the scoring blade. That way, you can slide the material against the backing and score, rotate the board, insert and score, etc. If the rotary trimmer scoring blades scores in the same place on every pass, then it would work great.

FastLearner wrote:
Even if you pushed really hard, it might not be enough for heavy cardboard, though.

Would the blade cut deep enough to make a few passes to get the score deep enough? Even a slight score would work in this case since it allows the board to bent along a straight and predictable line and with relatively little bunching.

Anonymous
Making Set-Up Boxes

seo wrote:
A perforating blade might also work ok (as long as you plan to later cover the folded edges with the art).

So many different types of blades for rotary cutters that I never knew existed!

Quote:
The key is to weaken the paper/cardboard fibres before you fold it, so that the folding line is straight.

This is probably true, though I think the results would be better with a light score on one side than a perforation that punches through the board. The main reason being that the assembly would be a little easier with a solid score to use as a basis for folding and for cutting out the corners.

In addition, the interior of the perforated box would show the perforations, where the interior of the scored board looks more finished (like a professionally made box).

phpbbadmin
Offline
Joined: 04/23/2013
Another possible configuration

While breaking down boxes at work, I came upon a box configuration that seemed pretty cool and possibly easy to make, so I thought I'd post it here.

Assembly instructions would be as follows:

    With a sharp x-acto or hobby knife, make the necessary cuts along the red line that seperates the #1 pieces from the #4 pieces.

Score the blue lines between pieces 1 and 2, then fold the #1 pieces towards the #2 pieces.

Score the blue lines between pieces 2 and 5. Fold pieces 2 towards piece 5.

Score the blue lines between pieces 4 and 5. Fold pieces #4 towards piece #5.

Score the blue lines between pieces 3 and 4. Fold piece # 3 toward piece # 4, but place the tab created by piece #1 in between these two folded pieces. Tape pieces #3 and 2 on the outside of the box.

That's it. Of course the lid would have to be a tad larger (maybe 1/4"?) than the bottom in order for the two pieces to 'nest' properly, but it seems to me like this would yield more professional looking and lasting corners. Any comments?

-M

[/]
FastLearner
Offline
Joined: 12/31/1969
Making Set-Up Boxes

The scoring blade doesn't cut: it's thin but not sharp, so it makes deep impressions in the paper/cardboard, crushing the fibers, but without breaking any. This is how paper (like cardstock) and thin cardboard are usually scored. It's only when it gets thick that it needs some cutting, and even then you can often get away without it.

The crushed fibers make it much more likely to bend at that point than anywhere else.

-- Matthew

seo
seo's picture
Offline
Joined: 07/21/2008
Making Set-Up Boxes

SiskNY wrote:
Quote:
The key is to weaken the paper/cardboard fibres before you fold it, so that the folding line is straight.

This is probably true, though I think the results would be better with a light score on one side than a perforation that punches through the board. The main reason being that the assembly would be a little easier with a solid score to use as a basis for folding and for cutting out the corners.

In addition, the interior of the perforated box would show the perforations, where the interior of the scored board looks more finished (like a professionally made box).

Yes, by all means the perforating blade is the least prefered option. Perforations are usually reserved for corrugated cardboard boxes only.

You also have a good point about the internal view.

seo
seo's picture
Offline
Joined: 07/21/2008
Making Set-Up Boxes

Darke wrote:
That's it. Of course the lid would have to be a tad larger (maybe 1/4"?) than the bottom in order for the two pieces to 'nest' properly, but it seems to me like this would yield more professional looking and lasting corners. Any comments?

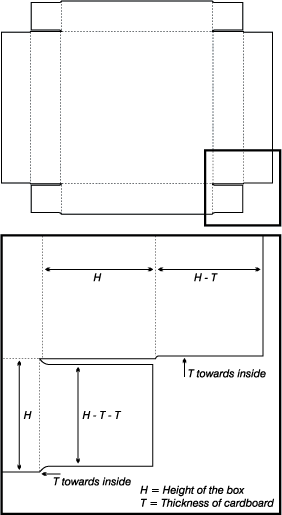
Just a small detail. As this box uses flaps in the corners, you might want to cut and fold taking cardboard thickness into account. It's just a bit of adjustment, but it will prevent the box to comb.

Here's a little explainatory drawing to better explain the concept. If you're using a light cardboard, this isn't too important, but you'll avoid a lot of trouble following this advice when working with heavier stock.

Seo

Anonymous
Making Set-Up Boxes

Darkehorse wrote:
While breaking down boxes at work, I came upon a box configuration that seemed pretty cool and possibly easy to make, so I thought I'd post it here.

I've seen this configuration on a lot of boxes made of heavier corugated cardboard (including some game boxes). Many of them have the lid integral with the body of the box (all one piece of cardboard).

Quote:
...it seems to me like this would yield more professional looking and lasting corners. Any comments?

Keep in mind thatt he corners of any set-up box are going to be covered with the artwork wrap.

seo wrote:
Just a small detail. As this box uses flaps in the corners, you might want to cut and fold taking cardboard thickness into account. It's just a bit of adjustment, but it will prevent the box to comb.

I think this is true, and would require some experimentaqtion to get the extra allowances right.

The boxes that I have seen have also had a thin extra section of board between the pieces that you have numebred 3 and 4. That is to allow extra fold over so that the flaps will fit over the inner corners (your number 1).

Anonymous
Making Set-Up Boxes

FastLearner wrote:
The scoring blade doesn't cut: it's thin but not sharp, so it makes deep impressions in the paper/cardboard, crushing the fibers, but without breaking any. This is how paper (like cardstock) and thin cardboard are usually scored.

Yeah, the fiskars equipment is made more for people who make their own greeting cards and stuff like that. Not intended for hard-core game makers like us.

FastLearner
Offline
Joined: 12/31/1969
Making Set-Up Boxes

Well, yes, but the scoring blade (and the scoring dies you could put on the blanket) at the offset printing house I used to work at did the same thing. Crushing the fibers works great: you get a clean fold and the product isn't weakened at all. I would bet that most game boxes use a damage-less score.

Anonymous
Making Set-Up Boxes

I'm not sure of the actual terminology used in the printing world (please correct me if I'm wrong), but crushing a material to fold it is referred to as creasing. Cutting partially through a material to form a fold line is referred to as scoring.

Quote:
I would bet that most game boxes use a damage-less score.

I don't have any experience working at a print shop or anything, but all my research into the manufacture of set-up boxes leads me to believe that they are made from either scored (by cutting) a single piece of board, or made from individual pieces of board (the top/bottom piece and the 4 sides) taped together on a form.

I reach this conclusion because of the artifacts caused by the creasing method that you mentioned versus the artifacts caused by the scoring method of assembly.

The evidence can be found on both the inside and the outside of the box at the joints where the side pieces meet each other and the top/bottom piece of box.

Look carefully at the joints on the outside of just about any set-up box and you will see that the artwork covers a gap between the edges of the top and the bottom. If you run a fingernail along this gap in the joints, you would find that, with little pressure, the artwork creases into the joint slightly. On the inside, they all have smooth corners where the sides meet the top/bottom piece.

This would indicate the methods of either scoring the board or of using separate boards with tape holding them together at the joints. There is a distinct lack of material at the joints on the outside of the box and clean, finished joints along the inside.

Compare this to the artifacts of creasing a board. Creasing results in a debossing (depression) along the face to which the crushing force is applied, and an embossing (raised surface) along the opposite face.

When folded, the board is folded so that the debossed crease becomes the inside joint and the embossed ridge becomes the outside joint. Doing so results in a different profile that the previously mentione method. On the outside, the embossed ridge will result in a more rounded profile due to the excess material that is forced away from the joint. Running a fingernail along the ridge will not crease into the joint at all (or only with more significant force).

On the inside, the sides of the joints may or may come together depending on the width of the creasing tool used to make the crease. A wider crease will result in more of a pronounced gap between the sides of the joints.

Quote:
I would bet that most game boxes use a damage-less score.

Remember that the damage caused by scoring is actaully minimized by the artwork itself. The artwork, when fully wrapped, serves to laminate and reinforce the joints regardless method of joining.

Creasing is commonly used for assembling tuckboxes or other pacjaging made from material that is either un-wrapped (the artwork is printed directly onto the box material) or is too thin for scoring.

FastLearner
Offline
Joined: 12/31/1969
Making Set-Up Boxes

The embossed side goes to the inside of the fold, when folded correctly, fyi.

phpbbadmin
Offline
Joined: 04/23/2013
Making Set-Up Boxes

*Wow*. Fascinating stuff. Thanks gentlemen. I know I'm eagerly awaiting the tutorial on how to wrap artwork around the box!

-Darke

Anonymous
Making Set-Up Boxes

Some great posts here - nice job Guys!

I had a question - I've seen a box which is one full sheet and folds into a complete box. It is of course cut so that it folds into a complete box.

Does anyone have a template for this?

Thanks in advance.

seo
seo's picture
Offline
Joined: 07/21/2008
Making Set-Up Boxes

You mean one piece for both bottom and top (with a hinge on one side), or one piece each part, but no pasting, just folding?

I have templates for both. Now that I think so, I might just place both... I'll look for the files and post them later.

Seo

Anonymous
Making Set-Up Boxes

yes Seo, that's exactly what I need.

Please let me know if you're able to find the files.

Appreciate your help.

seo
seo's picture
Offline
Joined: 07/21/2008
Making Set-Up Boxes

OK. You can get a PDF of the one piece box here. The box is made from one single piece of cardboard, and it opens like a book. It requires six gluing points, but it can be folded flat for storage when still empty. It might work for games, but I don't think it makes a really good choice.

---

This scan, OTOH, is for a half box (just adjust the size for bottom or top) that requires no gluing. My daughter has one game which uses this same design for its box. As the sides of the box are double, it can be built with a relatively light cardboard.

It is a good option if you self publish your games but don't have too much storing space. Since it only requires folding, no gluing at all, you can get the boxes printed and died, but store them flat until shipping time. It makes a really nice box.

Seo

seo
seo's picture
Offline
Joined: 07/21/2008
Making Set-Up Boxes

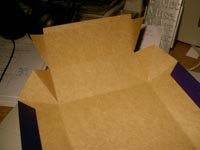
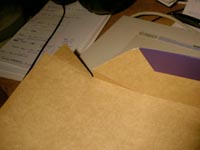
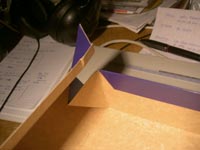
I'd just took a look at the box I mentioned my daughter has, and noticed it's a bit different from the design I posted. It has just two folding unglued sides (the shorter sides), and two with a smaller tab glued. The basic design is similar though, so I decided to post a few pics of how it works, It will serve both as a clarification to the previous design and an alternative.

So here are the pics, from unfolded to finished:


Seo.

Anonymous
Making Set-Up Boxes

FastLearner wrote:
The embossed side goes to the inside of the fold, when folded correctly, fyi.

Thanks for the correction, I have been doing my own tuck boxes the wrong way!

larienna
larienna's picture
Offline
Joined: 07/28/2008
Making Set-Up Boxes

Quote:

*Wow*. Fascinating stuff. Thanks gentlemen. I know I'm eagerly awaiting the tutorial on how to wrap artwork around the box!

You can print the card board in your printer if it is not too thick. Or yuo can print it on normal paper and use double sided tape on the whole surface and stick it over the unfolded box. Maybe you can also use a thin glue and paint it on the card board.

It is still possible that the paper will tear itself on the fold lines. You can add a transparent adhesive plastic on it if you really want your box to be more solid.

Anonymous
Making Set-Up Boxes

Larienna wrote:
Maybe you can also use a thin glue and paint it on the card board.

If you haven't invested in some spray adhesive, this is the time to do so. It will be a lifesaver when doing a full-wrap around a set-up box.

I would recommend wrapping the artwork after the box has been created. It will help reinforce the joints without undue stresses of being laminated first and then fodled.

Anonymous
Making Set-Up Boxes

Darkehorse wrote:
I know I'm eagerly awaiting the tutorial on how to wrap artwork around the box!

Ask and you shall receive! Check out this developing thread.

Syndicate content


forum | by Dr. Radut