Skip to Content
 

Peg inserts

24 replies [Last post]
schtoom
schtoom's picture
Offline
Joined: 08/31/2009

Hi everyone,

I've recently been playtesting a game with a group of friends, and would like to begin the prototyping it for possible submission. One of the mechanics of my game includes using 2 markers to indicate a "range" on a number line. One problem with markers is that if the playcard (think Arkham Horror character card-sized, maybe slightly larger) gets jostled, then the markers can slide around a bit. I am debating moving to pegs for this purpose, since a peg, once inserted into a hole, shouldn't move at all unless dumped upside down. However, I can't seem to find a good method for keeping the pegs in place on a playcard. I'm looking at making the playcards out of something thick, like the foam board stuff that has posterboard glued to both sides that you can find at Hobby Lobby or Michael's. Just punching holes in that stuff isn't very good though, since with just a little bit of play the holes get bent out of shape and widened to the point where they are no longer really usable. Does anyone know of something that I could glue or punch into the foamboard that would hold a peg in place and not look completely ghetto? I think most pegs are about .1" in diameter, if that helps at all. I'm open to scavenging parts from other games, if you know of a premade part that does this job already. I just couldn't think of any.

Thanks much in advance!

Schtoom

Zzzzz
Zzzzz's picture
Offline
Joined: 06/20/2008
Assuming you can set up your

Assuming you can set up your number line on one of the edges of your playermat, you might consider something like :

Just look around there might be other fancy shaped paper clips you could use. But doing this would help keep things in place. YES YES it will eventually ruin the board, but if you really want a simple prototype option something as simple as a paper clip might be a nice interim solution

scifiantihero
Offline
Joined: 07/08/2009
Maybe . . .

. . . some kind of grommet?

Willi B
Offline
Joined: 07/28/2008
Don't know if it will work for you...

But I am trying a sheet of the wall covering used by retailers to display miniatures. My local game store had a bunch of it and the holes seem to be pretty sturdy and about 1 inch apart. The store sold me a sheet around 4' by 6' for $5. More than enough for the 2 games I have planned.

I'm think (for my purposes) of attaching a second layer of board about 1 inch below it and using golf tees as pegs.

schtoom
schtoom's picture
Offline
Joined: 08/31/2009
The paperclip idea is a good

The paperclip idea is a good one, but cards are being played around the edges of the playcard in specific places. My apologies for not saying that the outside edge of the playcard was off limits.

A grommet is something I've looked at, too, but I'm having trouble finding one small enough. I actually went to Lowe's last night and spent some time just strolling through their hardware aisle. I think I can use plastic wall anchors; just cut off the majority of their length and use the top "finished" and flat portion to push down into the card. In theory it should be fairly flat with the top of the card and should be able to hold pegs.

I'm still open to any other ideas you may have. I appreciate all of the help so far!

gameprinter
gameprinter's picture
Offline
Joined: 08/06/2008
Just be careful...

Really thick boards that you can put pegs into and things like grommets really add to the production cost, so be prepared to implement a Plan B when you go to production. I've tried to find cheap ways to punch small holes in thick cardboard and haven't come up with anything yet.

Zzzzz
Zzzzz's picture
Offline
Joined: 06/20/2008
Sure sure leave out all the

Sure sure leave out all the facts!! ;)

Ok so how much do you see these boards moving during the game? Are you just attempting to avoid the simple *bump and move* situation? Or are these boards actually moved around during the game?

You might be over complicating the need for such a peg based solution, unless you assume your players will bump and move pieces so much that they cannot remember the values.

schtoom
schtoom's picture
Offline
Joined: 08/31/2009
In a perfect world, the

In a perfect world, the boards wouldn't move at all. The values represented by the markers/pegs change pretty regularly, if only by a single increment a turn. Since there are 5 of these lines, each with two markers, it's a fair amount for someone to remember.

Do you really think it is overkill to go for some sort of anti-jostling mechanism? I'm not trying to create parts for the sake of creating parts, that's for sure.

Thanks a ton for all of the assistance so far!

bluesea
bluesea's picture
Offline
Joined: 07/28/2008
schtoom wrote:Hi

schtoom wrote:
Hi everyone,

... However, I can't seem to find a good method for keeping the pegs in place on a playcard...Does anyone know of something that I could glue or punch into the foamboard that would hold a peg in place and not look completely ghetto? ...
Schtoom

Here's a solution from way back in 1981! Pegs in punched cardboard. And it looked so good (and worked so well) that it was even reproduced in the online version.

actual game piece:
www.boardgamegeek.com/image/325894
(NB: The black plastic trays only came with the UK version I believe. The American version only had the punched board. And still worked fine.)

online version
www.boardgamegeek.com/image/214257

Also check out the game Timber Tom where the pieces are in effect pegs but dressed up very nicely.
www.timbertom.eu

Zzzzz
Zzzzz's picture
Offline
Joined: 06/20/2008
That about using : These are

That about using :

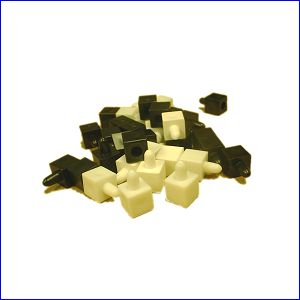
These are 15mm x 8mm squares, come in many colors (Red, Blue, Green, Yellow, Orange, Purple, White, Black).

AND they stack!!! So if you made the various tiny holes/indents you could place this peg upside down into the hole. If your two markers could ever *live* on the same position, you could just stack them one on top of another.

schtoom
schtoom's picture
Offline
Joined: 08/31/2009
Bluesea, that cardboard is

Bluesea, that cardboard is pretty much exactly what I'd like to go with. I've tried cardboard punching previously but it looks like i was using the non-pressed type, which appears to be much sturdier. The main problem I had was that after playing for a while, the hole got stretched out and became nearly unusable. I've looked around for a lot of differnt types of card stock, but I haven't been able to find that type of cardboard. Do you know where it is available (wouldn't be the first time I've searched for the right thing in all the wrong places. :) )? Also, do you know if there is a particular kind of tool for punching "neat"-looking holes? I just used a pick and exacto knife to create the others and while it can be neatened, it doesn't look very professional because consistency is tough to achieve.

Zzzzz, those are actually ideal, since it is possible for the range of numbers to only be one number. Where did you find them?

Thanks so much for all of your help!

Zzzzz
Zzzzz's picture
Offline
Joined: 06/20/2008
schtoom wrote: Zzzzz, those

schtoom wrote:

Zzzzz, those are actually ideal, since it is possible for the range of numbers to only be one number. Where did you find them?

Thanks so much for all of your help!

http://www.plasticsforgames.com/us/us_prod_pegs.asp

schtoom
schtoom's picture
Offline
Joined: 08/31/2009
Thanks so much, Zzzzz! I'm

Thanks so much, Zzzzz!

I'm still trying to track down some cardboard sheets, but the only thing I'm finding is the corrugated stuff and chipboard that is on par with the cardboard sheet on the back of a legal pad. Need something a little thicker and tougher than that. Anyone else have any ideas?

Then again, maybe grommets aren't a terrible way to go. I'd dismissed them because I couldn't find one small enough, but the pegs you showed me have 4mm wide peg portions so finding a grommet in that size might not be as bad.

bluesea
bluesea's picture
Offline
Joined: 07/28/2008
One of the best and cheapest

One of the best and cheapest sources of thick chipboard I've ever heard is tearing open an old 3 ring binder and recycle the board inside. (still like to see a game made from the left over rings!! ;) )

Dick Blick might carry chipboard as well. check here to see if this will work
http://www.dickblick.com/products/all-purpose-chipboard/

Zzzzz
Zzzzz's picture
Offline
Joined: 06/20/2008
Go to a craft/art store and

Go to a craft/art store and look for matting for framing pictures/artwork. I know JoAnn and Michaels usually carry left overs at discounted prices also. But even if you buy a piece at cost it should be reasonable and sturdy.

schtoom
schtoom's picture
Offline
Joined: 08/31/2009
Thanks a ton for all of your

Thanks a ton for all of your help, everyone!

I'm going to go on a little arts and crafts shopping spree this weekend!

schtoom
schtoom's picture
Offline
Joined: 08/31/2009
Just wanted to let you know

Just wanted to let you know that I stumbled onto a small sale at Hobby Lobby and got some 8"x10" Artist Canvas Panels. They are almost 4mm thick and very sturdy. They ended up costing me about $1 each, but since this a prototype intended for submission, I figured now isn't a bad time to splurge on something that looks nice. I printed out my game card (65lb card stock) to the same size and glued it to the canvas surface, then used a pick to punch the appropriate holes. I just ordered the pegs Zzzzz recommended, so I'm quite excited to see this in operation.

Thanks again to everyone!

drewdane
drewdane's picture
Offline
Joined: 11/28/2008
Even though I'm a bit late...

My brother and I used to play the hell out of Screaming Eagles, which came with these cards to keep track of damage, and weapons stores. It was a neat solution that came to mind while I was reading this thread.

The pegs were probably the exact same as the ones from Battleship, and the cards were really thick cardboard. (Hobby Lobby carries illustration board which is similar in thickness.)

As I said, we played this game incessantly, and had no problems with stretching. Here are the cards: http://boardgamegeek.com/image/58526

schtoom
schtoom's picture
Offline
Joined: 08/31/2009
As I've gone through the

As I've gone through the playtesting process with my game, I ended up moving away from the individual player boards I described earlier to a single main board.

This is really just an FYI for anyone who plans to make a board that uses pegs. I got a piece of 5MM luaun that I used for the board itself. I glued the face of the board (just sturdy cardstock that I printed on) to the wood and did two experiments with creating the holes. I used an awl/pick to punch holes through the cardstock/wood layer and that worked pretty well. I also tried using a drill, but the results were not as good. The drill tended to tear the paper around the hole it created, causing it to be flared up. The awl-punched holes simply pushed the paper into the hole, making it look much nicer, I thought. The drill was obviously much faster, but the nice thing about the awl was that the holes were much more well-centered on my pre-printed hole marks. The drill tended to move ever so slightly when starting the hole, resulting in less perfect rows of holes.

Both methods messed up the back of the wood pretty well, causing a lot of splintering. I just pulled off the larger splinters with my fingers and then sanded it down as best I could but the back of the board was still not pretty. I glued some cheap black fabric to the back to make it smoother and less likely to scratch a tabletop. The fabric I used was pretty thin, so the roughness of the back is still obvious if you're looking for it but it won't scratch anything it sits on, at least. When I make another, I'll probably move to something thicker, like felt perhaps.

Black Canyon
Black Canyon's picture
Offline
Joined: 05/30/2009
How to help with drilling

I just read over your ordeal with pegboards. I went through the same thing not too long ago, but I ended up using a drill, and it worked fine. This is how I did it.

First of all, I used very thin craft plywood for the peg board. I also scrapped all paper involved in the process because drills don't work on paper. In order to get the text and images onto the wood, I used a blender maker transfer (http://www.boardgamegeek.com/thread/424570). To prevent chipping and damage to the top and bottom surfaces, I sandwiched the boards (I had to make six identical boards) between extra layers of wood and clamped them together. These two layers received all of the chipping and splintering, while the inner layers which eventually became the game boards ended up with amazingly clean.

Here is what the final produce looks like. Since this was just a playtest build, I didn't bother with fancy graphics.
http://www.boardgamegeek.com/image/537193 (had trouble inserting an image)

schtoom
schtoom's picture
Offline
Joined: 08/31/2009
Wow, that does look really

Wow, that does look really good. Unfortunately, I'm using a fair amount of color coding which sort of precludes me from using the blender maker transfer. I'll definitely see what I can do with extra pieces of wood, though. That was a really good idea that I never would of thought of.

When I make my next board for the game, I think I can use a combination of what you've suggested to make it better. I've already done a fair amount of playtesting with this one, so I think I'll start making a new one somewhere around the beginning of the year. I'll be sure to post pictures this time.

Thanks for all of the help!

schtoom
schtoom's picture
Offline
Joined: 08/31/2009
Do you know if the

Do you know if the sandwiching method you used will work to prevent damage to cardstock glued to wood? It wasn't absolutely terrible and an Xacto knife was good enough to clean up the frayed cardstock around the edges of the hole, but if sandwiching would fix that, too, that'd be awesome.

Thanks!

Black Canyon
Black Canyon's picture
Offline
Joined: 05/30/2009
Yes

Yes, sandwiching the boards together with the cardstock would help prevent fraying.

One other important thing to note: Make sure your drill is spinning as fast as possible.

The slower the bit spins, the more chipping and tearing you'll get. Also, there are different bits depending on the material you're cutting. Don't use a metal cutting bit; use a wood cutting bit. The difference is the angle of the blade and the material of the bit. Although a metal or all-purpose bit will cut wood, it doesn't to as good a job as one designed for use on wood.

I just remembered one more thing: the whole "sandwich" of boards and protective outer layers must be clamped together as tightly as possible! Only drill next to the clamp. This way the drill travels through the whole thing as if it were one solid piece of material. If the clamp isn't tight or you drill far away from the clamp where the layers can separate, the sawdust will push itself between the layers and you'll end up with destroyed holes again.

schtoom
schtoom's picture
Offline
Joined: 08/31/2009
Thanks again for the

Thanks again for the excellent advice! Now if only I can get some time to work on it. :)

unicornucopia
unicornucopia's picture
Offline
Joined: 04/10/2010
Ah ha!

Thank you bluesea for revealing the origin of your Avatar at last. Couldn't quite place it, which is sad considering it is one of the games I credit most with shaping my personality/creativity.

Nicely done.

Syndicate content


forum | by Dr. Radut